Homemade Strategies: Getsuga Tenshō – A Complicated Name for My Complicated Strategy?
Today I’m gonna try to do something different regarding strategies: I am not going to review someone else’s strategy and instead I am going to explain one of my own. And I say “try” because I might miss some details which I take into consideration when trading, but I promise I’ll do my best to include all the steps. Sometimes a strategy is not everything you need and discretion in picking the best trades is also required, but hopefully, this article will give you a reliable system. As a side note, I use this system mainly for trading EUR/USD, simply because I haven’t tested it enough on other pairs, not because it doesn’t work on them. The time frame of the chart is 5 minutes.
Getsuga Tenshō Components and Trade Rules
In case you’re wondering about the name, well… my strategy – I get to choose the name… just a perk of making your own strategy. Ok, now for the real deal. Let’s keep it structured because we have a lot of work ahead (All Indicators are available to download at the bottom of the page):
The first indicator is called XPMA and it’s basically a colored Moving Average (Triple Exponential, but let’s not go into details) which will show us the trend. In other words, if the XPMA is Red, don’t even think about bullish trades (buys if you are trading CFD or Call if you are trading BO). If the XPMA is Blue, don’t touch the Sell/Put button. A little on the technical side: for a reason that eludes me, by default this indicator shows Red for an uptrend and Blue for a downtrend, which I find confusing. When you attach the indicator to your chart, go to the “Colors” tab and switch the colors. I also disabled all alerts and arrows displayed by the indicator. The settings period I use for this indicator is 75.
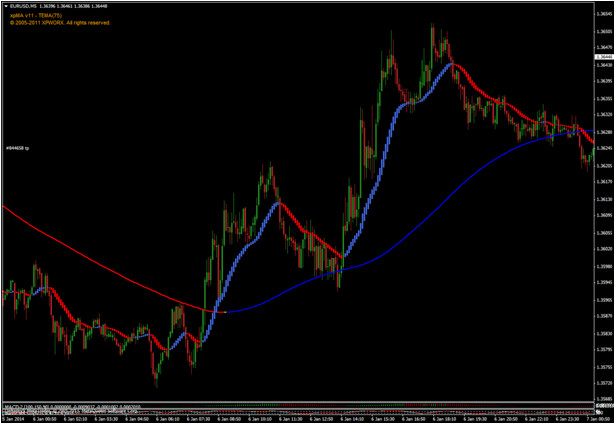
The second indicator is called HAMA and it’s sort of a hybrid between Heiken Ashi candles and some moving averages. Its purpose is to give us an entry signal by identifying a retracement and the end of that retracement aka trend resumption/continuation. Just like the XPMA, this indicator has 2 colors (Red for down and Blue for up) but it is faster (default settings cannot be changed). So far we have two indicators which work together to show us waves, cycles within the prevailing trend, just like in the picture below:

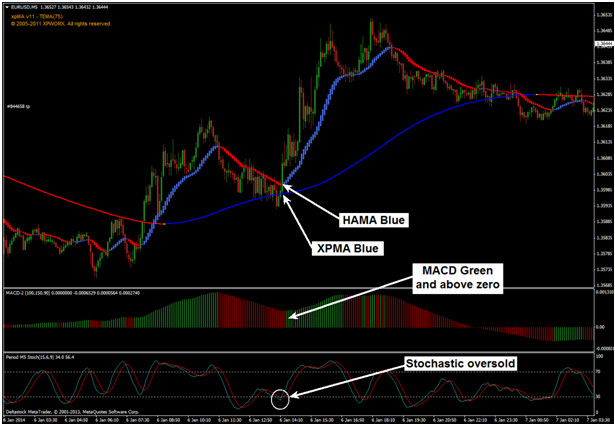
When the XPMA (which shows the main trend) becomes Blue we consider the market to be in an uptrend so we will wait for a move lower followed by trend continuation. In other words, we need the HAMA (the faster line) to become Red, suggesting the retracement has begun and then to become Blue once again, indicating the end of that retracement. Ok, halfway there… you didn’t think it was this easy, did you?
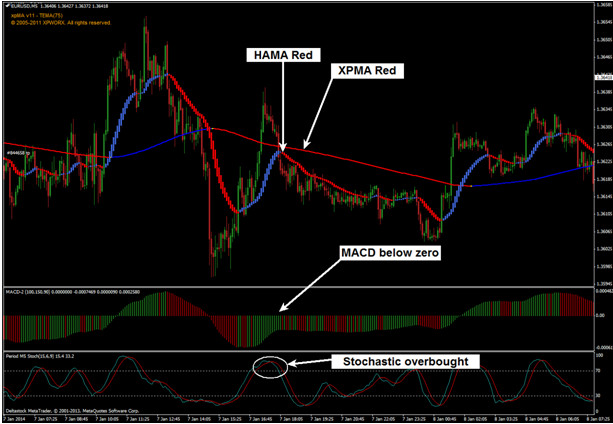
The third indicator is the MACD, but not the normal one… it’s special and also has special settings: 100, 150, 90. We all know that trend following strategies fail in ranging markets and the purpose of this MACD is to keep you out of this kind of market. So when a Bullish trade is taken, the MACD has to be above its zero levels (even better if it’s Green) and for a Bearish trade, it has to be below the zero levels (even better if it’s Red). If the waves of the indicator are small, ranging above and below the zero levels, don’t trade because you are probably in a ranging market.
The fourth and final indicator is the Stochastic with settings 15, 6, 9, with levels set at 70 and 30 (not the usual 80 and 20). Bullish trades will be taken when the Stochastic is showing oversold and Bearish trades will be taken when it shows overbought, with all other conditions in agreement, of course. Now that we discussed all the indicators, here are some pictures of the complete strategy:
Bullish entry:

Bearish entry:


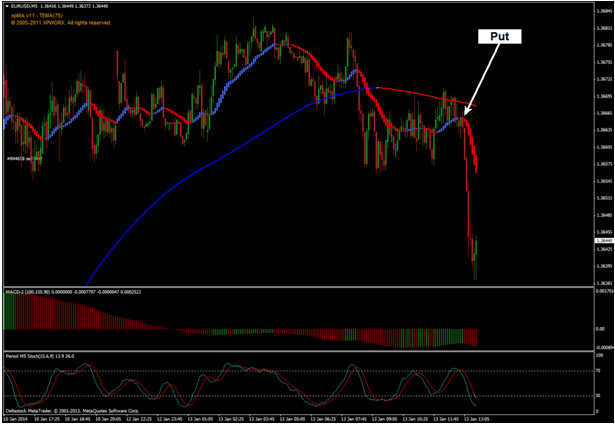
The last picture shows a Bearish taken in real-time, while I was writing this article. The XPMA was Red, indicating a downtrend, HAMA went up to show a retracement higher, followed by the resumption of the downtrend (HAMA became Red once again). Also, MACD was below zero and Stochastic indicated an overbought condition so all the rules were met. Expiry time should be set according to how fast the market moves and can vary quite a lot… just like the market conditions.
Trading FX, CFD, Crypto And BO With “Getsuga Tenshō”
The main difference between CFD and Binaries is the exit, not the entry. In other words, if you are trading Contracts For Difference (and I include here currency pairs, aka Forex, Crypto and any other tradable assets), you will have to set Stop Loss and Take Profit orders.
These orders have to be set in accordance with your risk and money management but as a rule of thumb, I use the previous high/low for my Stop Loss (if I am trading bullish I set the SL behind the previous low; if I am trading bearish I set the SL behind the previous high). As for Take Profit, I usually stay in a trade until HAMA changes color again: if it’s Blue when I enter, I will exit when it turns Red and vice-versa.
When trading binary options, expiry time should be set according to how fast the market moves and can vary quite a lot so you will need to make a few tests.
Why does Getsuga Tenshō Suck?
Let me be honest here (and maybe a bit subjective): it doesn’t suck. It’s what I use on a daily basis for trading Forex and although it gives me bad trades sometimes, the winners clearly outnumber the losers. The thing is that you will need some experience to trade it and all its signals should be taken with a pinch of salt. For example, if the entire day price moved strongly to the upside, don’t trade Calls/Buys in the evening just because you missed the big move that happened during the day. Price is likely to retrace after an extended move in one direction and your signal might generate a losing trade (retracement appears to be over but it is not). The strategy is designed to keep you out of such bad trades but not always, so apply some discretion when trading.
Why the Getsuga Tenshō doesn’t Suck?
A strategy with such an awesome name has no chance of sucking. I’m joking, of course. The real reason why it doesn’t suck is because it keeps you on the right side of a trend, giving you a good entry after a retracement, while the price is overextended against the trend, which is the best place to open a high probability trade. The MACD also keeps you out of choppy, ranging markets and shows price momentum so I believe it incorporates enough quality components to give you profitable trades no matter if you trade Forex, CFD or Binary Options.
Wrapping it up – Even the Best Strategies Suck Sometimes…
This strategy is the result of a lot of trial and error and many hours spent staring at my charts. It tries to incorporate a lot of what I know about the markets and also, basic trading principles such as trend – pullback/retracement – a continuation, but is not fail-proof. You will get bad trades with it and here is where your own experience and view of the market comes in. Avoid trading at news time or when volatility and volume are low. Last but not least, I don’t recommend you to trade this strategy, but I do recommend you to test it and see if you can get a good grasp of it. Only if you are satisfied with the results, invest real money, but understand there are no guarantees so trade it at your own risk.
More Downloads and Discussions:
Download Getsuga Tensho Indicators